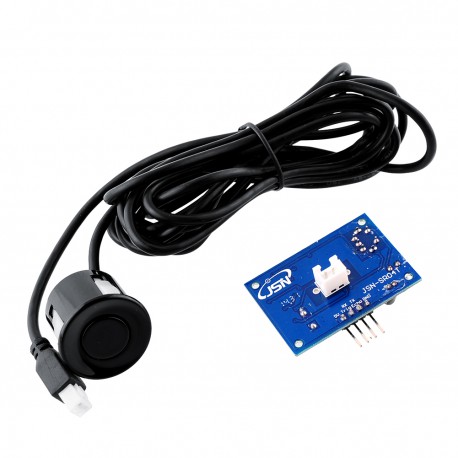
La mesure du niveau de fioul dans la cuve se fait pas un capteur à ultrasons.
Dans le cas ou vous souhaitez vous familiariser avec les différentes techniques de mesures de liquide dans des cuves, vous pouvez aller là:
Mesures de hauteur de liquide
J'ai fait fit de toutes ces approximations et le pourcentage d'erreur du capteur état déjà de 2%, je n'ai donc pas ponderer la mesure faite par celui-ci.
Comme je ne prend pas en compte la dilatation du fioul en fonction de la température qui est de 8/1000 pour une variation de 10°C.
Pour un puriste il faudrait pouvoir gérer la température, le coéfficient K de propagation des ultrasons dans le mélange air/vapeur de fioul, ainsi que l'erreur de mesure du capteur.
	const int trigPin = 1;
	const int echoPin = 0;
	void setup() {
	  Serial.begin(9600);
	}
	void loop()
	{
	  long duration, inches, cm;
	  pinMode(trigPin, OUTPUT);
	  digitalWrite(trigPin, LOW);
	  delayMicroseconds(2);
	  digitalWrite(trigPin, HIGH);
	  delayMicroseconds(10);
	  digitalWrite(trigPin, LOW);
	  pinMode(echoPin, INPUT);
	  duration = pulseIn(echoPin, HIGH);
	  // convert time into cm
	  cm = microsecondsToCentimeters(duration);
	  Serial.print(cm);
	  Serial.print("cm");
	  Serial.println();
	  delay(1000); // delais d'une seconde
	}
	long microsecondsToCentimeters(long microseconds)
	{
	  return microseconds / 29 / 2;
	}
Première étape, il faut tout d'abord selectionner une capteur étanche tel que (en vente ici)
et celui-ci devra être monté sur un arduino.
Le code ci dessus que vous pouvez copier utilise les pin 0 et 1. En sollicitant la console arduino vous verrez s'afficher les valeurs mesurées.
J'ai ajouté la mise en place de ces données sur une base MYSQL pour historiser toutes les données et ainsi pouvoir créer un graphique.
Vous pouvez visualiser le travail final à la page : indicateur niveau fioul
/* Utilisation du capteur Ultrason JSN-SR04T */
#include
#include

byte mac[] = {
  0xDE, 0xAD, 0xBE, 0xEF, 0xFE, 0xED };

// Enter the IP address for Arduino, as mentioned we will use 192.168.1.33
// Be careful to use , insetead of . when you enter the address here
IPAddress ip(192,168,1,33);
char server[] = "karl.bouchez.free.fr"; // If you have a web page, enter its address (ie. "www.yourwebpage.com")

// Initialize the Ethernet server library
EthernetClient client;

// définition des broches utilisées
int trig = 12;
int echo = 11;
long lecture_echo;
long cm;

void setup()
{
  pinMode(trig, OUTPUT);
  digitalWrite(trig, LOW);
  pinMode(echo, INPUT);
  Serial.begin(9600);
    // start the Ethernet connection
  Ethernet.begin(mac, ip);
}

void loop()
{
   digitalWrite(trig, HIGH);
  delayMicroseconds(10);
  digitalWrite(trig, LOW);
  lecture_echo = pulseIn(echo, HIGH);
  cm = lecture_echo / 58;
  Serial.print("Distancem : ");
  Serial.println(cm);
    // Connect to the server (your computer or web page)
  if (client.connect(server, 80)) {
    client.print("GET /write_data_fuel.php?"); // This
    client.print("value="); // This
    client.print(cm);
    //client.print(photocellReading); // We are making a GET request just like we would from our browser but now with live data from the sensor
    client.println(" HTTP/1.1"); // Part of the GET request
    client.println("Host: karlytau.raidghost.com"); // IMPORTANT: If you are using XAMPP you will have to find out the IP address of your page.
    client.println("Connection: close"); // Part of the GET request telling the server that we are over transmitting the message
    client.println(); // Empty line
    client.println(); // Empty line
    client.stop();    // Closing connection to server

  }

  else {
    // If Arduino can't connect to the server (your computer or web page)
    Serial.println("--> connection failed\n");
  }

  delay(5000); //1000 pour 1 seconde

}
Avec en plus la mise a jour de la data base en utilisant le module arduino comme client web.
Le fichier final est ICI en version WIFI
Le fichier final est ICI en version Filaire
#include
#include

byte mac[] = {
  0xDE, 0xAD, 0xBE, 0xEF, 0xFE, 0xED };

// Enter the IP address for Arduino, as mentioned we will use 192.168.1.33
// Be careful to use , insetead of . when you enter the address here
IPAddress ip(192,168,1,33);

// defines pins numbers
const int trigPin = 9;
const int echoPin = 10;
// defines variables
long duration;
int distance;
int i = 0;
char server[] = "karl.bouchez.free.fr"; // IMPORTANT: If you are using XAMPP you will have to find out the IP address of your page.

// Initialize the Ethernet server library
EthernetClient client;

void setup() {

 pinMode(trigPin, OUTPUT); // Sets the trigPin as an Output
pinMode(echoPin, INPUT); // Sets the echoPin as an Input

  // Serial.begin starts the serial connection between computer and Arduino
  Serial.begin(9600);

  // start the Ethernet connection
  Ethernet.begin(mac, ip);

}

void loop() {

  //photocellReading = analogRead(photocellPin); // Fill the sensorReading with the information from sensor

  // Connect to the server (your computer or web page)
  if (client.connect(server, 80)) {
    client.print("GET /write_data.php?"); // This
    client.print("value="); // This
    client.print(i);
    //client.print(photocellReading); // And this is what we did in the testing section above. We are making a GET request just like we would from our browser but now with live data from the sensor
    client.println(" HTTP/1.1"); // Part of the GET request
    client.println("Host: karl.bouchez.free.fr"); // IMPORTANT: If you are using XAMPP you will have to find out the IP address of your page.
    client.println("Connection: close"); // Part of the GET request telling the server that we are over transmitting the message
    client.println(); // Empty line
    client.println(); // Empty line
    client.stop();    // Closing connection to server
 i = i + 5;
  }

  else {
    // If Arduino can't connect to the server (your computer or web page)
    Serial.println("--> connection failed\n");
  }
   delay(1000);
}